


Orange Butter Lip Balm
This has been one of our most popular promotional lip balms! We are often asked if we brought this lip balm to events, conferences and even business meetings.
This...
While spring is technically here, I think that the weather can’t quite decide if it should be freezing winter or warm spring. I feel like the weather is behaving just like a yo-yo!
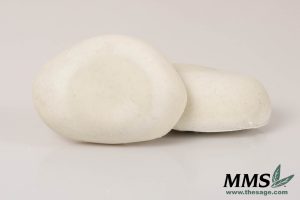
Finished Pumice Stone Soap
Despite all of the crazy weather, my mind is firmly entrenched in spring. I am paging through seed catalogs with wistful sighs and looks of longing. I am waiting impatiently to start early vegetables such as spinach, lettuce, and cabbage. I am planning my days and my garden schedule with more precision than I thought I would ever possess as an adult. Since I am already preparing for the garden season, I thought I ought to get a head start on my garden soap, since I know I will spend every possible moment in the dirt, tending to my little seedlings.
While I am a gardener and plan on this soap being my garden soap come spring and summer, this soap is also superb at helping de-grease and de-grit ultra dirty hands. This recipe is perfect for machinists, tilers, contractors, welders, auto mechanics, painters and anyone else who gets a little dirty doing a job. This soap is intended to take on some of the toughest jobs you can give a bar of soap and with the included pumice, it has a LOT of scrubbing power. Come join me!
|
Ingredients Coconut Oil Palm Kernel Oil Olive Oil Sodium Hydroxide Water Pumice Gladiator Fragrance Oil |
Equipment Scale Microwave Safe Container Spoons Pipettes Goggles Gloves |
Recipe:
|
Recipe in Grams 170 grams Coconut Oil 141.75 grams Palm Kernel Oil 141.75 grams Olive Oil 70 grams Sodium Hydroxide 170 grams Water 28 grams Pumice 8.5 grams Gladiator Fragrance Oil |
Recipe in Ounces 6 oz Coconut Oil 5 oz Palm Kernel Oil 5 oz Olive Oil 2.47 oz Sodium Hydroxide 6 oz Water 1 oz Pumice 0.3 oz Gladiator Fragrance Oil |
Recipe in Percentages 37.5% Coconut Oil 31.25% Palm Kernel Oil 31.25% Olive Oil Q.S. Sodium Hydroxide Q.S. Water Q.S. Pumice Q.S. Gladiator Fragrance Oil |
Since I was making soap with pumice, the punny part of me thought it would be hilarious to make this soap into the shape of stones using our new Stone Soap Mold! 😂 Oh, I just crack myself up! Have you had a chance to use these molds? They are wonderful and quickly becoming my new favorite!
 Weighing Coconut and Palm Kernel Oil |
 Weighing Olive Oil |
Start by weighing the Coconut Oil, Palm Kernel Oil and Olive Oil into a microwave-safe container. Heat those oils gently until liquid. While the oils are heating in the microwave, weigh out your lye and mix with your water. Remember to add your lye to your water, not the other way around. Your safety is our first concern! (And it is easier to create new good habits than to try to break old, bad ones.) Allow the warmed oils and the lye solution to cool.
 Ready to make soap! |
 Adding Lye Solution to Oils |
While allowing your oils and lye solution to cool, I like to put away my buckets of oils and set up my mold during this period. This helps keep my counters clean and my distractions to a minimum. When your oils and lye solution are both around 100°F-110°F, add your lye solution to your oils. Remember, using lower temperatures is important if you want smooth looking soap. Using your immersion blender, mix your soap until you reach a light trace. When a light trace has been achieved, you can hand stir in the Gladiator Fragrance Oil and the pumice. I don’t recommend using your immersion blender because the pumice can damage the blades pretty quickly.
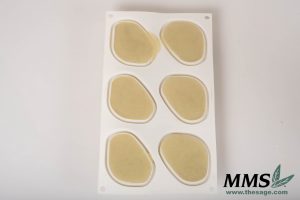
Allowing the soap to set up in our new Soap Stone Mold!
Remember, trace doesn’t denote a viscosity, it just means that we aren’t seeing the oils float to the top and separate out. Often we pour our soap into the mold when it is the viscosity of whole milk. That is extremely fluid! One way I like to tell if I have reached trace or not is to stop blending and take a moment to fill a drinking glass with water. If the soap stays a smooth texture, it is ready to pour into your mold. If you develop a slick of oil on the top of your soap, it needs a tiny bit more mixing.
Allow your soap to sit in the mold undisturbed for 12-24 hours. Then cut into bars (or release from the individual cavities in your mold) and place out on a shelf where they can dry. You can use your soap immediately, but it will last longer if you allow it to dry completely. It will also keep longer if you store it in an area where it doesn’t sit in water constantly. A great aid in determining if your soap has fully dried are our Cure Cards. The best part is you can have them included in qualifying orders for free! If you want a set, let our order desk know, they are awesome at taking care of special requests.
Once the soap has fully cured, package it and give it away or use it yourself. This soap is so simple to make and I love the smell! Can anyone say sexy?
![]()
This...


