
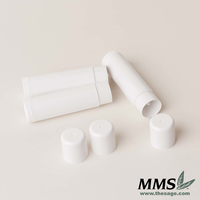
Bigger Lip Balm Tubes
These tubes are about 3.75 inches tall and 3/4 inches in diameter. These tubes also have the mechanism at the bottom like our regular lip balm tubes (0.15 ounce size). The tubes are white and only sold as a set of the tube and cap. We don't sell these as just the tubes or just the caps, only as a set.
A single jar of Lip Solutions will fill about 20 of these Bigger Lip Balm Tubes.
To see our Shrink Bands for the Bigger Lip Balm Tubes, click here.

Big Lip Balm Tubes, Black
This tube has the twisting mechanism at the collar, not at the bottom like our 0.15 ounce tubes. The tube and cap are black.
When you need more lip balm this is the tube to choose!
A single jar of Lip Solutions will fill about 40 of these Big Lip Balm Tubes.
This tube is only sold with the cap as a set. We will not be able to sell just the tube or just the cap, only a set, thank you.
To see our Shrink Bands for the Big Lip Balm Tubes, click here.
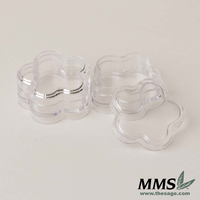
Daisy Butter Pots
Each jar holds 1/4 ounce.
Sold only as complete sets, which are a jar and a cap. If stacking is desired, only one cap is needed for the whole stack. Please hold the extra caps over for when you wish to transport each jar separately.
Enjoy!
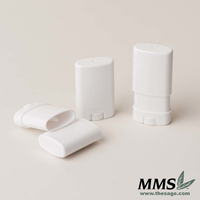
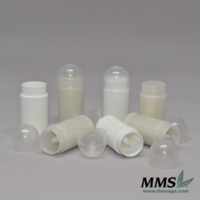
Deodorant Tubes, Mini Sized
You might try a deodorant, a lip balm, a lotion bar or other type of product in these tubes. If you are a deodorant maker send in a written description and story so we can make you a guest blogger for the day.
You know, it is all about the details so let me give you some numbers:
Height: 2.38 inches
Width (longest): 1.47 inches
Width (narrowest): 0.69 inches
Circumference of Label Area: 3.75 inches
Label Height: max of 1.63 inches
Capacity: 0.4 ounces*
Color: White
Sold only in Sets - a tube and cap is a set.
*Please note that your mixture may have a specific gravity or density than our Lip Solutions so this weight may be very different for you. Test to determine what this tube holds for your mixture.

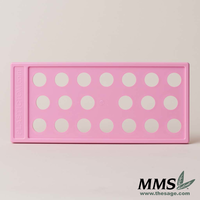
Lip Balm Filling Tray
We were so pleased to get the regular lip balm tray AND a tray for the slim stick tubes! Can you believe it?! If you would like a tutorial, then please go to Plastic Tom's Tutorial for assistance. Our photographer was in today taking pictures. I couldn't believe how fast we were able to make 50 tubes. Simple. Clean. And dishwasher safe.
Don't confuse these trays with those which are milled, these professional trays are injection molded of HDPE. A super class act!
In photo order from top to bottom:
Order the Regular Tray for bottom twist. To see our Regular Size Tubes click here.
Order the Oval Lip Balm Tube tray for oval tubes. To see our 0.15 oz Oval Tubes click here.
Order the Slim Stick Tray for the Slim Stick tubes. To see our Slim Stick Tubes click here.
We have a couple of hints for users.
1) Pour the lip balm mixture as cool as possible. The tubes can become mis-shapen if the lip balm mix is super hot. Use our quick test to determine if your lip mixture is ready: stir the mixture with a pipette, hold the pipette horizontal after stirring, if the pipette bends downward then the mixture is WAY too hot. If the pipette holds it's rigid form and the mixture is still clear then the mixture is at perfect pouring temperature.
2) Load the tray with tubes just before filling. Long term storage of tubes held in the tray can cause temporary distortion of the tubes. To return tubes to their original shape, remove them from the tray and allow them to sit without their caps for a few days.
3) Allow the filled tubes to fully cool before removing from the tray. This may take a hour depending on the temperatures of the lip balm mixture and the room where you are working. Then, when the tubes are cool, give the tube a twist just before pulling straight out. The lip balm mixture at the top of the tube (the glorious crown!) can be damaged if the lip balm is too soft when removed from the tray. Patience is certainly an asset in this case.
ATTENTION! Before you use this tray please look VERY closely at the tutorial. Specifically look at the picture that shows the first pour into the tray. There are three tubes that have been filled and the fourth tube is being filled in the photo. We want you to notice the cooled lip balm mixture around the top of the Pyrex container. Please stir your lip balm mixture until it develops a haze just like this photo. If you pour while the lip balm is still too hot then the tubes can be temporarily warped. When the warping happens the caps may not fit tightly. If you will cool the lip balm mixture until a haze develops the chances of warping the tubes is greatly decreased.
What happens if you have poured too hot? Well, we suggest placing the cap on the tube then fitting a shrink band over the tube and heat shrinking the band. This short period of heating will relax the plastic tube and allow it to go back to the original size.
UPDATE! We now have the tray for the oval lip balm tubes!
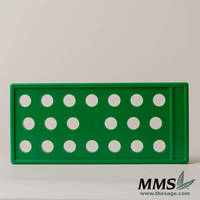
Lip Balm Filling Tray - BIGGER Tubes
If you would like a tutorial, then please go to Plastic Tom's Tutorial for assistance.
Don't forget to order the BIGGER tubes for use with this tray.
This tray can be washed in the dishwasher.
We have a couple of hints for users.
1) Pour the lip balm mixture as cool as possible. The tubes can become mis-shapen if the lip balm mix is super hot. Use our quick test to determine if your lip mixture is ready: stir the mixture with a pipette, hold the pipette horizontal after stirring, if the pipette bends downward then the mixture is WAY too hot. If the pipette holds it's rigid form and the mixture is still clear then the mixture is at perfect pouring temperature.
2) Load the tray with tubes just before filling. Long term storage of tubes held in the tray can cause temporary distortion of the tubes. To return tubes to their original shape, remove them from the tray and allow them to sit without their caps for a few days.
3) Allow the filled tubes to fully cool before removing from the tray. This may take a hour depending on the temperatures of the lip balm mixture and the room where you are working. Then, when the tubes are cool, give the tube a twist just before pulling straight out. The lip balm mixture at the top of the tube (the glorious crown!) can be damaged if the lip balm is too soft when removed from the tray. Patience is certainly an asset in this case.
ATTENTION! Before you use this tray please look VERY closely at the tutorial. Specifically look at the picture that shows the first pour into the tray. There are three tubes that have been filled and the fourth tube is being filled in the photo. We want you to notice the cooled lip balm mixture around the top of the Pyrex container. Please stir your lip balm mixture until it develops a haze just like this photo. If you pour while the lip balm is still too hot then the tubes can be temporarily warped. When the warping happens the caps may not fit tightly. If you will cool the lip balm mixture until a haze develops the chances of warping the tubes is greatly decreased.
What happens if you have poured too hot? Well, we suggest placing the cap on the tube then fitting a shrink band over the tube and heat shrinking the band. This short period of heating will relax the plastic tube and allow it to go back to the original size.
To see the Bigger Tubes, click here.
Enjoy!
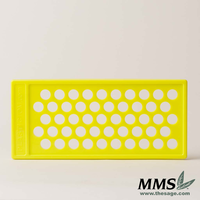
Lip Balm Filling Tray - BIG Tubes
If you would like a tutorial, then please go to Plastic Tom's Tutorial for assistance.
Don't forget to order the BIG tubes for use with this tray.
This tray can be washed in the dishwasher.
We have a couple of hints for users.
1) Pour the lip balm mixture as cool as possible. The tubes can become mis-shapen if the lip balm mix is super hot. Use our quick test to determine if your lip mixture is ready: stir the mixture with a pipette, hold the pipette horizontal after stirring, if the pipette bends downward then the mixture is WAY too hot. If the pipette holds it's rigid form and the mixture is still clear then the mixture is at perfect pouring temperature.
2) Load the tray with tubes just before filling. Long term storage of tubes held in the tray can cause temporary distortion of the tubes. To return tubes to their original shape, remove them from the tray and allow them to sit without their caps for a few days.
3) Allow the filled tubes to fully cool before removing from the tray. This may take a hour depending on the temperatures of the lip balm mixture and the room where you are working. Then, when the tubes are cool, give the tube a twist just before pulling straight out. The lip balm mixture at the top of the tube (the glorious crown!) can be damaged if the lip balm is too soft when removed from the tray. Patience is certainly an asset in this case.
ATTENTION! Before you use this tray please look VERY closely at the tutorial. Specifically look at the picture that shows the first pour into the tray. There are three tubes that have been filled and the fourth tube is being filled in the photo. We want you to notice the cooled lip balm mixture around the top of the Pyrex container. Please stir your lip balm mixture until it develops a haze just like this photo. If you pour while the lip balm is still too hot then the tubes can be temporarily warped. When the warping happens the caps may not fit tightly. If you will cool the lip balm mixture until a haze develops the chances of warping the tubes is greatly decreased.
What happens if you have poured too hot? Well, we suggest placing the cap on the tube then fitting a shrink band over the tube and heat shrinking the band. This short period of heating will relax the plastic tube and allow it to go back to the original size.
To see the Big Tubes, click here.
Enjoy!
Lip Balm Tray - Mini Tube
If you would like a tutorial, then please go to Plastic Tom's Tutorial for assistance.
Don't forget to order the MINI tubes for use with this tray.
To see our Mini Size Tubes click here.
This tray can be washed in the dishwasher.
We have a couple of hints for users.
1) Pour the lip balm mixture as cool as possible. The tubes can become mis-shapen if the lip balm mix is super hot. Use our quick test to determine if your lip mixture is ready: stir the mixture with a pipette, hold the pipette horizontal after stirring, if the pipette bends downward then the mixture is WAY too hot. If the pipette holds it's rigid form and the mixture is still clear then the mixture is at perfect pouring temperature.
2) Load the tray with tubes just before filling. Long term storage of tubes held in the tray can cause temporary distortion of the tubes. To return tubes to their original shape, remove them from the tray and allow them to sit without their caps for a few days.
3) Allow the filled tubes to fully cool before removing from the tray. This may take a hour depending on the temperatures of the lip balm mixture and the room where you are working. Then, when the tubes are cool, give the tube a twist just before pulling straight out. The lip balm mixture at the top of the tube (the glorious crown!) can be damaged if the lip balm is too soft when removed from the tray. Patience is certainly an asset in this case.
ATTENTION! Before you use this tray please look VERY closely at the tutorial. Specifically look at the picture that shows the first pour into the tray. There are three tubes that have been filled and the fourth tube is being filled in the photo. We want you to notice the cooled lip balm mixture around the top of the Pyrex container. Please stir your lip balm mixture until it develops a haze just like this photo. If you pour while the lip balm is still too hot then the tubes can be temporarily warped. When the warping happens the caps may not fit tightly. If you will cool the lip balm mixture until a haze develops the chances of warping the tubes is greatly decreased.
What happens if you have poured too hot? Well, we suggest placing the cap on the tube then fitting a shrink band over the tube and heat shrinking the band. This short period of heating will relax the plastic tube and allow it to go back to the original size.
To see the MINI Tubes, click here.
Enjoy!

Lotion Bar Filling Tray
Don't forget to order the Lotion Bar tubes for use with this tray.
This tray is for the Lotion Bar tubes in our catalog. See the lotion bar tubes here.
This tray can be washed in the dishwasher.
We have a couple of hints for users.
1) Pour the lip balm mixture as cool as possible. The tubes can become mis-shapen if the lip balm mix is super hot. Use our quick test to determine if your lip mixture is ready: stir the mixture with a pipette, hold the pipette horizontal after stirring, if the pipette bends downward then the mixture is WAY too hot. If the pipette holds it's rigid form and the mixture is still clear then the mixture is at perfect pouring temperature.
2) Load the tray with tubes just before filling. Long term storage of tubes held in the tray can cause temporary distortion of the tubes. To return tubes to their original shape, remove them from the tray and allow them to sit without their caps for a few days.
3) Allow the filled tubes to fully cool before removing from the tray. This may take a hour depending on the temperatures of the lip balm mixture and the room where you are working. Then, when the tubes are cool, give the tube a twist just before pulling straight out. The lip balm mixture at the top of the tube (the glorious crown!) can be damaged if the lip balm is too soft when removed from the tray. Patience is certainly an asset in this case.
ATTENTION! Before you use this tray please look VERY closely at the tutorial. Specifically look at the picture that shows the first pour into the tray. There are three tubes that have been filled and the fourth tube is being filled in the photo. We want you to notice the cooled lip balm mixture around the top of the Pyrex container. Please stir your lip balm mixture until it develops a haze just like this photo. If you pour while the lip balm is still too hot then the tubes can be temporarily warped. When the warping happens the caps may not fit tightly. If you will cool the lip balm mixture until a haze develops the chances of warping the tubes is greatly decreased.
What happens if you have poured too hot? Well, we suggest placing the cap on the tube then fitting a shrink band over the tube and heat shrinking the band. This short period of heating will relax the plastic tube and allow it to go back to the original size.
To see the Lotion Bar Tubes, click here.
Enjoy!
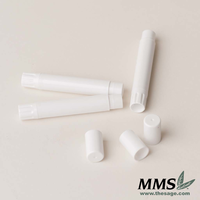
Mini Lip Balm Tubes and Caps
Need help with a label? Well, we have created labels for this tube and feel the label can be up to 13/16 inches in height and up to 2 inches wide. This is not an overlap type of label.
Tubes and caps are sold only as a set, please don't ask us to separate them. Thanks!
Slim Stick Tubes
Caps and tubes are included in this set.
Use our regular size Lip Solutions and get about 110 tubes! We know that is the coolest!
The best label size is probably 1.75 inches wide by 1.25 inches tall.
Check out our filling tray! Push tubes into the tray and fill 50 in no time flat! You will love it! To see the Lip Balm Filling Tray click here.
Shrink Band Note: We have a shrink band to fit this Slim Stick Tube. The product code is 802-5086. See the Shrink Bands here.