

Winter Sunshine Cuticle Oil
Ingredients:
4.58 ounces Sunflower Oil (91.5%)
0.25 ounces Meadowfoam Oil (5%)
0.05 ounces Cordyceps Mushroom Extract (1%)
0.05 ounces...
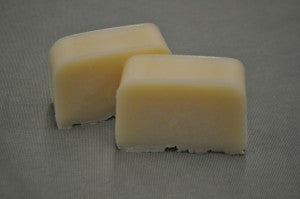
Finished Soap
Today we will be making our first batch of soap. For our first batch of soap, I wanted to use Shea Butter as our luxury oil. Shea Butter makes for a very nice soap. It adds conditioning and emollient properties. What does this mean for your skin? It means this soap feels super creamy and rich. And the best part of it all? You made it!

Weighing Oils
Now that we have decided on our luxury oil, it is time to determine to rest of our oils. I am fond of using Coconut Oil, Hydrogenated Soybean Oil and Olive Oil. These are all oils that are easy for me to get and I know they make a firm bar with lots of lather.

Making Lye Solution
There is just one more thing we need to decide before we get started. The percentage of excess fat we will leave in this soap. Excess fat where we leave some extra fat that we don’t convert into soap. We do this to prevent the soap from having excess lye. Excess lye soaps can feel harsh to the skin. The excess fat contributes to the conditioning feeling.

Mixing Lye Solution and Oils
The sweet spot is anywhere from 5% to 8% excess fat. Any more than that and we can struggle with our soap turning rancid or dreaded orange spots (DOS). Any less and the soap can be too harsh. I really like to use 6% excess fat. You can determine excess fat for yourself using our handy-dandy lye calculator! Let’s go make some soap!
|
Ingredients Hydrogenated Soybean Oil Coconut Oil Olive Oil Shea Butter Sodium Hydroxide (Lye) Water |
Equipment Scale Microwave Safe Container Spoons Pipettes Thermometer Immersion Blender |
Recipe:
|
Recipe in Grams 170 grams Hydrogenated Soybean Oil 142 grams Coconut Oil 113 grams Olive Oil 29 grams Shea Butter 64 grams Sodium Hydroxide (Lye) 177 mL Water |
Recipe in Ounces 6 oz Hydrogenated Soybean Oil 5 oz Coconut Oil 4 oz Olive Oil 1 oz Shea Butter 2.26 oz Sodium Hydroxide (Lye) 6 fl oz Water |
Recipe in Percentages 37.5% Hydrogenated Soybean Oil 31.25% Coconut Oil 25% Olive Oil 6.25% Shea Butter Q.S. Sodium Hydroxide (Lye) Q.S. Water |

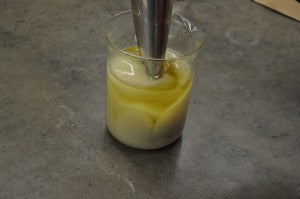
Ready to Blend
Weigh the oils into a microwave safe container. Place into the microwave and heat. While the oils are heating, weigh the lye. Slowly add the lye to your container of water. DO NOT add water to your container of lye. The two chemicals reacting can cause a dangerous volcano. It is best to create good safety habits now, before you make a batch of soap that is 20 lbs in size.
Mixing Soap
For most soaps, you will want to mix your oils and lye solution when both are somewhere between 110°F to 130°F. We recommend having your oils and lye solution within 10°F of each other. In the winter when your soaping area is cooler, you will want to soap at higher temperatures. In the summer when your soaping area is warmer, you will want to soap at cooler temperatures. With the current weather we are having in Utah, I am soaping closer to 110°F to 115°F.
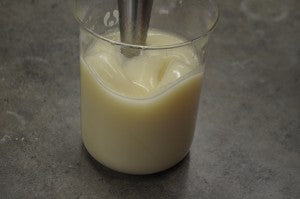
Mixing Soap
When your lye solution and oils are within the ideal temperature range, slowly pour the lye solution into the oils. Using either an immersion blender or a soap spoon, mix until you reach trace. Trace is when the raw soap has been mixed enough that oil will no longer rise to the surface when mixing has stopped. If you aren’t sure if you have achieved trace then stop mixing, go get a glass, fill it with water, do not drink it. Come back to your soap. Is oil floating on the surface? This short distraction will allow unmixed oil to rise to the surface.
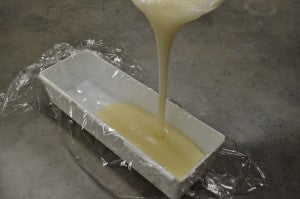
Pouring Soap into Mold
Once trace is reached you can pour the soap into a mold. Allow the soap to sit undisturbed for 12-24 hours. After the soap has been allowed to sit for up to 24 hours, you can unmold the soap and cut it. Arrange the cut bars of soap in an area where there is good air flow but where they will not be in the way. I like to put them on a sheet of cardboard. You are now ready for the curing process. The curing process is just allowing the soap to dry out, giving you a nice hard bar. You can use your soap immediately after cutting but it will not last as long as a fully cured bar.

Soap in the Mold
A great way to determine if your bar has cured all the way is to use our Cure Cards! Did you know you can get them free in qualifying orders? How cool is that?!
![]()
Ingredients:
4.58 ounces Sunflower Oil (91.5%)
0.25 ounces Meadowfoam Oil (5%)
0.05 ounces Cordyceps Mushroom Extract (1%)
0.05 ounces...
This...


