


Winter Sunshine Cuticle Oil
Ingredients:
4.58 ounces Sunflower Oil (91.5%)
0.25 ounces Meadowfoam Oil (5%)
0.05 ounces Cordyceps Mushroom Extract (1%)
0.05 ounces...
Today is Chopstick Day, and I had to interrupt Katy’s Foot Maintenance Week with this fun soap. After all, what else would a soaper do with chopsticks but make swirled soap?

Finished bars with the colorants I used.
Part of my inspiration for this soap came from the discovery of my old wooden slab mold when I was looking for something else in our storage area. You can imagine my excitement to find the very mold that I thought was gone forever! It turns out that I had forgotten that I’d put it in the storage area because the bottom had fallen off and I had not gotten around to finding nails to put it back on. Luckily, my husband found the right nails to put the bottom on permanently and I was excited to use the mold again. When I was reviewing the creative inspirations for February, I was delighted to see that today is Chopsticks Day.
Since I love colorful soaps, I pondered until I’d come up with an idea for a great color combination. I’m usually inspired by a fragrance when making a multi-colored soap. I have a bottle of our Lavender 40/42 Extra Essential Oil that I’ve wanted to use in soap, so that gave me the idea for a lavender base. I used Lavender Fields Color, and it’s absolutely perfect for the base layer! To add a swirled layer on top, I wanted to try a few of our colorants that I haven’t used yet. Yellow Oxide was calling me, and I hoped I’d be able to get a sunny yellow color rather than a brownish mustard. I debated between black and white. I settled on white to hopefully make the entire design seem brighter. To round out my colors, I chose Ultramarine Pink to get a fuchsia.
Let’s grab all the supplies we need and make some soap!
|
Ingredients Coconut Oil Olive Oil Palm Kernel Oil Soybean Oil Rice Bran Oil Shea Butter Sweet Almond Oil Distilled Water Lye Ultramarine Pink premixed with glycerin* Yellow Oxide premixed with glycerin* Lavender Fields premixed with glycerin* Titanium Dioxide premixed with glycerin* Lavender 40/42 Extra Essential Oil |
Equipment Scale Soap Mold Soap Cutting Tool Soap Bucket Soap Spoon Squeeze Bottles Plastic Bread Bags Colorant Scoops Stick Blender Chopstick |
* Dispersing the pigment in liquid glycerin makes it easier to add to the raw soap mixture. I mix 1 ounce of pigment into 2 ounces of liquid glycerin (by weight). Mix well, then store any leftovers in a bottle.
|
Recipe in Ounces (43.3 oz oils) 18.6 oz Coconut Oil 9.3 oz Olive Oil 9.3 oz Palm Kernel Oil 2.7 oz Soybean OIl 2 oz Rice Bran Oil 0.7 oz Shea Butter 0.7 oz Sweet Almond Oil 6.72 oz lye 1 fl. oz. Lavender 40/42 Extra essential oil |
Recipe in Percentages 42% Coconut Oil 22% Olive Oil 22% Palm Kernel Oil 7% Soybean Oil 4% Rice Bran Oil 1.5% Shea Butter 1.5% Sweet Almond Oil |
Instructions:
For this soap, you’ll need a slab mold. This can be anything that is a shallow, box-like shape. You can use a plastic dishpan (that’s what I used to make my first-ever batch of soap!), a glass baking dish (line with butcher paper and do not use it for cooking after that!), a shoe box lined with butcher paper. You get the idea. Whatever you use, line it with butcher paper or plastic wrap so you’ll be able to get your soap out of the mold. My wooden mold is 8.5″ x 11″, and I poured the soap 1.5″ deep, which took a 43.3-ounce batch.
If you have not made cold process soap before, I recommend this blog post as a great starting point, which covers safety and gives a simple recipe with step-by-step instructions. We’d rather see you have a successful experience than becoming frustrated!
 Line bottles with plastic bags to make cleanup almost effortless. |
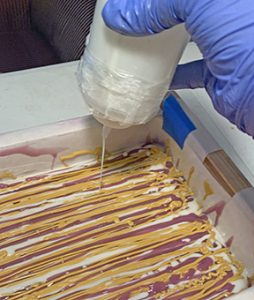 Squeezing outlines of soap, alternating colors. |
Before beginning, I lined my wooden mold with butcher paper. I’m out of practice for sure! It wasn’t pretty, but I think it will hold the soap. Fingers crossed! (Only a small bit of soap leaked out at the corners.)
After combining the oils and lye water solution, I stirred and stick blended just to a very light trace. I added the Lavender 40/42 Extra Essential Oil and stirred well to mix it in. Then I poured about 12 ounces of raw soap into each of three measuring cups to make the colors for the swirl.
I used Lavender Fields color with some Titanium Dioxide to make a beautiful lavender in the remaining soap. This went into my slab mold first. At first, I intended to save some of the lavender soap to use in the swirl, but I had made up my mind to use only 3 colors in the swirl. So all the lavender colored soap made my bottom layer.
 Bags are perfect for getting all the soap! |
 Beginning the first step, going back and forth across the lines of soap. |
I gave the mold several thumps on the counter to level the top and make sure there weren’t any air bubbles. Then I set it aside while I mixed my three swirl colors. First, Titanium Dioxide to make white. For the yellow, I used a little Titanium Dioxide with Yellow Oxide. For fuchsia, I used Ultramarine Pink with some Titanium Dioxide to keep the color bright.
I was unsure how much of each pigment I’d need to get the color I wanted, so I just added a little at a time, stirring well after each addition. I stick blended just enough to make the pigments not be speckled in the soap. When I was happy with the colors of each soap portion, I poured each color into a plastic bag-lined squeeze bottle and screwed on the lids.
Watching other soapers work via YouTube is one of my favorite things to do. I feel so inspired, and I pick up great tips. Thank you to all who make great videos!! One tip I really appreciate is to line a squeeze bottle with a plastic bag to make cleanup a snap. The plastic bag means no bottles with leftover soap that are a pain to clean! I really wish I could give credit, but I have forgotten where I saw the tip. I was delighted that it worked perfectly!
 The first step of the swirl is done. |
 The random swirl technique is a lot like free motion quilting. |
Now for the boring part. You have to make a lot of lines of color, squeezing them out back and forth across the soap. You want to leave a bit of space between the lines and place the colors next to each other, not atop each other. First white, then fuchsia, then yellow. Repeat. Repeat. Repeat. (If this were a video, I’d definitely speed up this part!)
When I’d gotten close to the end of the soap in a squeeze bottle, I removed the top and pulled out the bag. I pressed the remaining raw soap into a bottom corner of the bag, and I snipped off a tiny bit at the corner. That way I could finish using up all of the soap without having to just splatter it across all my carefully-poured lines. All right, the lines weren’t all that straight, but I wanted lines, not blobs! And that’s what I got.
After thumping the mold on the desk a few times to even out the top, I put my chopstick into one corner all the way to the bottom of the mold and dragged it back and forth all across the soap. I liked the pattern a lot, but I wanted to do some random swirling.
 Don’t forget to use a cure card! I weigh my soaps once a week, record the weight, then put them back on the curing rack. |
 Finished bars of soap with the jars of color. |
I pondered where to begin and finally put my chopstick back in about the center of the longer edge of the mold. Then I randomly swirled around this way and that until I’d done all I wanted to do. I pulled out the chopstick and decided where next to swirl. It reminded me a lot of free-motion quilting on a long-arm machine. You can make all the beautiful designs you like, but you have to be careful not to sew (or swirl) yourself into a corner! Luckily, moving a chopstick to another area of raw soap is far simpler than moving a long-arm sewing machine! Just pull up the chopstick, wipe off the soap, and stick it back in where you want to be next.
After spraying 99% alcohol over the top of the soap to avoid soda ash formation (or at least minimize it), I placed a cutting board over the top of the wooden mold and wrapped it in towels to insulate the soap. I like colored soaps to completely go through gel phase, and if the soap is not insulated, the gel phase often does not extend all the way out to the edges of the soap, which stay cooler. Gel phase needs heat.
When I took the soap out of the mold after around 18 hours, it was still pretty soft. I could have left it another 12 hours, but I needed to cut it and take photos so I could share it with you all! Overall, I am pleased with how the colors came out. But I wonder how they would look if I had not added the Titanium Dioxide. I see another experiment in my future in which I test the lighter colorants with and without Titanium Dioxide.
Is anyone else using the creative prompts to make things and perhaps break out of a rut? If you are, please share with us! We love seeing what our Adventurous Makers are doing!

Ingredients:
4.58 ounces Sunflower Oil (91.5%)
0.25 ounces Meadowfoam Oil (5%)
0.05 ounces Cordyceps Mushroom Extract (1%)
0.05 ounces...
This...


