Capping the finished lip balm.

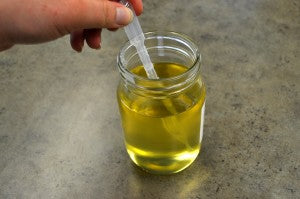
Lip Solutions after being melted in the microwave.
Technically summertime is just around the corner, but I do feel that summer is here already. It isn’t just the warmer temperatures that make me to feel this way either, it’s my lip balm. 😮 My current favorite lip balm is easily applied with just a little body heat. In the cooler months this lip balm is great, however the summertime finds the lip balm melting in my pocket. Argh!

Stirring the Lip Solutions after adding the additives.

Adding the Oil Soluble Lip Colors.
Today, I’m going to make a new batch of lip balm using our Lip Solutions and show you how to use the plate test to check your lip balm
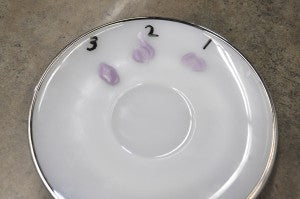
before filling your lip balm containers. A plate test can be used the check the firmness, flavor, or texture of a lip balm. We are going to use the plate test today to check the firmness of a lip solution after adding flavor, extracts, color and beeswax.
I was so excited that I got to play with our newest extracts for this little project! They don’t add any taste to the lip balm, but they do add some great skin conditioning benefits.
Collect needed items:
Recipe Total in the Final Product:
Recipe in ounces for 70 tubes
10.08 ounces Soy Lip Solutions – Extra Firm (1 jar)
0.56 ounces Grape Flavor Oil
0.21 ounces Green Tea Extract
0.21 ounces Sea Buckthorn Extract
1.0 ounces Beeswax
q.s. Ruby Lip Balm Color, Oil Soluble*
q.s. Blue Lip Balm Color, Oil Soluble* |
Recipe in grams for 70 tubes
285.7 grams Soy Lip Solutions – Extra Firm (1 jar)
16 grams Grape Flavor Oil
6 grams Green Tea Extract
6 grams Sea Buckthorn Extract
28.4 grams Beeswax
q.s. Ruby Lip Balm Color, Oil Soluble*
q.s. Blue Lip Balm Color, Oil Soluble* |
Recipe in Percentages
83.5% Soy Lip Solutions – Extra Firm (1 jar)
4.7% Grape Flavor Oil
1.8% Green Tea Extract
1.8% Sea Buckthorn Extract
8.2% Beeswax
q.s. Ruby Lip Balm Color, Oil Soluble*
q.s. Blue Lip Balm Color, Oil Soluble* |

Mixing the colors into the Lip Solutions.

Colored Lip Solutions.
* To color these lip balms, I used our
Oil Soluble Lip Colors. I have the professional sizes of these colors in the kitchen and I used 2 drops from the yorker cap for each color to achieve the purple color. This color is light enough to not color the lips, but strong enough to tell someone that this is a grape lip balm.

Placing a few drops on the plate.

Cooling lip balm.
Remove the lid from the jar of Lip Solutions. Microwave in short bursts until the Lip Solutions is completely melted. Once the Lip Solutions is melted, add the Grape Flavor, Green Tea Extract and Sea Buckthorn Extract. Stir until all of the additives have been incorporated. The lip balm will be very soft after the addition of the additives, so the plate test is very useful in determining when you have made a lip balm too soft or firm.

Testing the lip balm.

A soft lip balm is easily mashed.
At this time, you can put put away the flavor and extracts since they will will not be needed anymore. This will conveniently give you more work room. 😉 Grab your plate and drop 1 or 2 drops of melted Lip Solutions on to it. The lip balm will cool very quickly since the plate is cooler than the jar. After the lip balm completely cools on the pate, use your clean fingers to press and rub the lip balm. Once you have some lip balm on your finger, apply it to your lips. Now evaluate the lip balm. Ask yourself these questions.
- Is the lip balm firm enough to the touch for my (or my customers) preferences? Or is it too soft?
- Is the texture right or is it lacking?
- How do my lips feel?
- Is this flavor strong enough for what I wanted?
- Is this lip balm sweet enough?
- Do I need to add something to round this flavor?
- Am I happy with the flavor that this has produced?
- Am I happy with the overall product?

1/2 ounce of Beeswax ready to be added.
If you can answer these questions to your satisfaction, then you can fill your tubes. But what if you have a problem that you want to fix? Do you pitch your lip balm and start over? I don’t see many reasons that would
prevent you from saving a lip balm. These are examples of things that you can do to fix a lip balm.
-
The lip balm is too soft.
- Add more wax. Start with small increments like 1/4 to 1/2 ounce of Beeswax or 1/8 to 1/4 ounce of Carnauba and/or Candelilla Wax.
-
The lip balm is too hard.
- Add more liquid oils. Start with small increments like 1/4 to 1/2 ounce of any oil of your choice. These oils can be the same oils that you already have in your formulation or you can add a new oil to the formulation.
-
The lip balm doesn’t have enough flavor.
-
The lip balm has too much flavor.
- If there is too much flavor you may need to increase your batch size.

Adding the Beeswax.

Waiting for test #2 to cool.

Testing the second version of the lip balm.
Now that I’ve thoroughly provoked those gears in your brain to turn, let’s backtrack to our Lip Solution. As you can see in the photos, this is now very soft and
definitely not summer pocket worthy! I added 1/2 ounce of Beeswax to the Lip Solutions to help it become firmer. After stirring until the Beeswax was completely melted and incorporated into the Lip Solutions, I repeated the plate test. This time the lip balm was firmer, but it still wasn’t as firm as I would have liked it to be for summer weather.

This lip balm didn't mash as easily.

Another 1/2 ounce of Beeswax ready to be added.
Once again, I added 1/2 ounce of Beeswax to the Lip Solutions. After stirring until the Beeswax was completely melted and incorporated into the Lip Solutions, I repeated the plate test for the third time. This time the lip balm was much firmer and exactly the texture I wanted for a summer lip balm that could handle the hot weather.

Waiting for Test #3 to cool.

Testing #3.
Note: You may notice that I used a Dry-Erase marker on the glass plate to mark above each test. While I’d like to say that my memory is fully functional, I have to admit that sometimes my day is very fractured. 🙄 (Ok, maybe most days.) This means that marking the samples prevents me from having to start over again or guessing. Testing always needs accurate notes to help you know which product you liked best!

Comparison between batches.

A loaded filling tray.

A completely filled tray as it cools.
I hope you find this information useful the next time you make lip balm. Who knows, you might be able to fix that next batch that doesn’t turn out just right! I’ll be sending 70 samples to shipping tomorrow, but you can start requesting your sample with your order today. 😀

P.S. Did you know you can use the information in this post for making solid perfumes. You can even use our Lip Solutions for a solid perfume base. Cool!
